
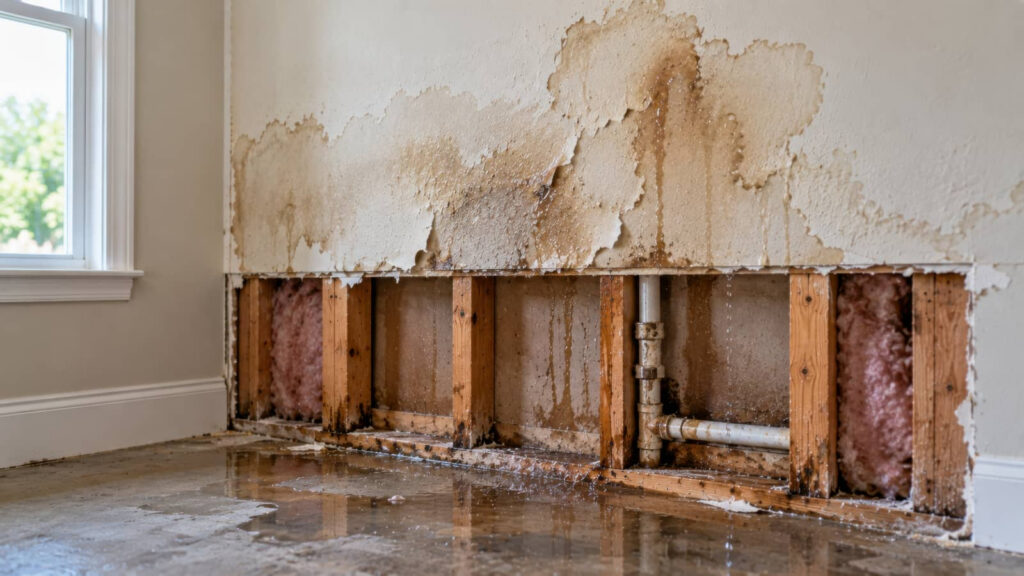
What you probably don’t know is that wall damage from a leak often spreads far beyond the visible stain, soaking insulation, framing, and fasteners before drywall softens. Wall Water Damage Repair should begin by tracing the moisture path, stopping the source, and verifying how far saturation extends before cutting or patching anything. If you skip that sequence, you can trap moisture, miss mold growth, and weaken the wall assembly in ways that aren’t obvious at first.
Key Takeaways
- Shut off water and nearby power immediately, then identify whether the leak came from plumbing, an appliance, or a window or roof penetration.
- Inspect walls for stains, bubbling paint, soft drywall, warped trim, musty odors, and damp or cool spots around outlets and ceilings.
- Open affected wall sections, remove saturated insulation, and dry studs and cavities with fans, dehumidifiers, and moisture meter checks.
- Replace drywall or plaster that is swollen, crumbling, sagging, moldy, or detached, because these conditions usually mean repair alone is unreliable.
- Call a licensed professional if the leak source is unclear or if mold, wiring, insulation, or structural components are involved.
Spot Wall Water Damage Early
How do you catch wall water damage before it spreads? You inspect methodically, because early detection protects your home and everyone in it.
Look for yellow-brown stains, blistering paint, swollen drywall seams, warped baseboards, and musty odors. Touch surfaces carefully; cool, damp areas often signal trapped moisture behind the wall.
Use a flashlight at a low angle to reveal texture changes. Check around windows, ceilings, outlets, and plumbing-adjacent walls, but keep electrical safety first and avoid energized wet areas.
If you have a moisture meter, compare suspect sections with dry reference spots. Document what you find with photos and dates so your household stays coordinated.
Fast observation supports effective wall water damage repair after leak problems and helps your community of caregivers respond with confidence and care together.
Stop the Leak at the Source
Shut off the water supply immediately, then trace the leak to its origin before you begin any wall water damage repair after leak issues. Confirm whether the source is a supply line, drain line, roof penetration, window failure, or appliance connection.
If water is near outlets, switch off power to the affected circuit first.
Work methodically, like the capable homeowner you’re becoming. Dry the surface enough to inspect fittings, valves, seals, and nearby penetrations. Tighten loose connections carefully, replace failed washers, and isolate cracked components.
Use towels or a wet vacuum to control spread while you test. Run fixtures one at a time and watch for active drips, pressure loss, or recurring seepage.
When the source isn’t obvious, document conditions and call a licensed plumber so your repair team stays safe and aligned.
Decide If the Wall Can Be Saved
Next, assess whether the affected wall materials still have structural and sanitary value. Inspect drywall, plaster, insulation edges, trim, and fasteners for swelling, crumbling, delamination, rust bleed, or persistent staining. Press gently with a gloved hand; if surfaces deform, crumble, or detach, replacement is usually safer than repair.
Check whether baseboards have warped and whether joints have opened.
Use a flashlight to trace the damage boundary and identify any sagging, soft spots, or compromised attachment points. If water reached electrical boxes, stop and involve a qualified professional before touching nearby materials.
Treat visible microbial growth, sewage contact, or foul odors as contamination indicators; those conditions usually mean removal is the responsible choice.
Dry Wet Drywall and Hidden Moisture
Once you’ve confirmed the wall is worth saving, dry the drywall cavity and all adjacent materials quickly to stop continued deterioration and reduce the chance of hidden mold growth.
Shut off power to affected circuits, wear gloves and eye protection, and improve airflow with fans and dehumidifiers. Open the wall enough to vent insulation, studs, and sheathing.
Use a moisture meter to track progress instead of guessing. You should test drywall edges, base plates, and nearby trim because water often wicks farther than stains suggest.
Remove saturated insulation promptly; it traps moisture and slows drying. Keep indoor humidity controlled and check concealed corners, outlets, and floor-wall joints for persistent dampness.
Your goal is consistent, documented dryness across the entire assembly so everyone on site follows the same safe, disciplined standard.
Repair the Wall or Call a Pro
Two clear factors decide whether you should repair the wall yourself or call a pro: the extent of structural damage and the presence of active moisture or contamination.
If drywall feels soft, crumbles, sags, or shows mold growth, stop and escalate. Your goal is controlled repair, not guesswork.
You can usually handle minor staining or a small, dry patch if the leak is fixed, framing is solid, and moisture readings are normal.
Wear gloves, eye protection, and a respirator when cutting or sanding. Remove damaged material to clean edges, verify cavity dryness, then patch, tape, mud, sand, prime, and repaint.
Call a licensed pro if water reached insulation, wiring, multiple wall sections, or load-bearing components. That decision protects your home and keeps your repair standards aligned with responsible homeowners.
Frequently Asked Questions
How Much Does Wall Water Damage Repair Usually Cost?
You’ll usually pay $300 to $2,500 for wall water damage repair, but severe structural or mold-related work can exceed $5,000. You should inspect moisture levels, stop leaks, and document damage early to protect your home.
Will Homeowners Insurance Cover Wall Damage From a Leak?
Yes, your homeowners insurance may cover wall damage from a sudden, accidental leak, but it usually won’t cover gradual damage or neglect. You should document moisture, stop the source safely, and review your policy exclusions carefully.
How Long Does Wall Water Damage Repair Typically Take?
You can expect wall water damage repair to take one day or several weeks: minor drying moves fast, hidden moisture slows everything. You’ll belong with pros who inspect, dry, sanitize, and verify safe moisture levels first.
Can Water-Damaged Walls Cause Mold-Related Health Problems?
Yes, you can face mold-related health problems from water-damaged walls, especially if moisture persists. You should isolate affected areas, improve drying, and arrange inspection quickly to protect your indoor air and everyone’s respiratory safety.
How Can I Prevent Future Wall Leaks and Moisture Damage?
Inspect regularly, seal promptly, ventilate consistently: you’ll prevent future wall leaks and moisture damage by checking plumbing, roofing, and caulk, repairing cracks, controlling indoor humidity, and installing barriers. You protect your home, and your household stays safer.
Summary
Treat wall water damage like a slow fuse—you need to cut it off before it reaches the frame. Confirm the leak is stopped, test for hidden moisture, and replace any drywall or insulation that can’t be safely dried. If staining, softness, or mold persists, don’t gamble with structural integrity or air quality. Follow a methodical repair plan, use proper protective gear, and call a licensed pro when the damage runs deeper than the surface you can see.